This is Novos

Home / Blog / SEO /

A Step-by-step Guide to Event Tracking in Google Analytics Through Google Tag Manager in 2022

Xavier Harley-Rudd from NovosXavier Harley-Rudd in SEO

1st August, 2021

Why set up event tracking in Google Analytics

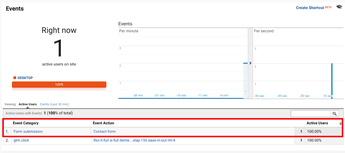
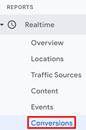
Custom event tracking is probably one of the most useful features of Google Analytics. It helps you figure out how your users behave on your site. Sure, you can easily go to page views in your GA to see what pages the users visited and how much time they spent on it but wouldn’t you like to know how they interact with those pages?

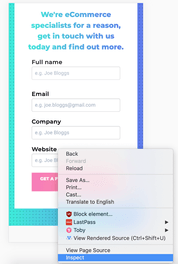
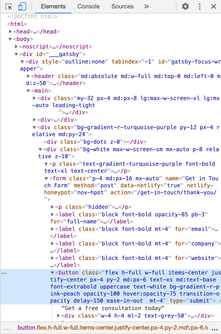
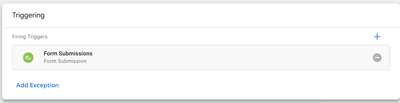
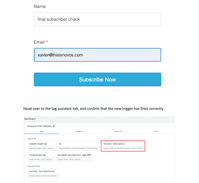
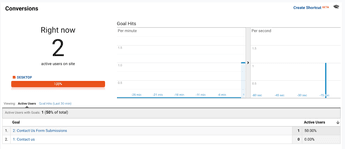
For example, you have a form on the website that displays the ‘thanks’ message on the same page after the submit button is clicked. Now, as the user wasn’t taken to a separate ‘thank you’ page, you wouldn’t be able to track the form submissions unless you set up event tracking. Take another example: The user started filling your form but left the site without submitting it, can you still get to know this? Yes, only with event tracking! Setting up custom event tracking in your Google Analytics will help you simply know your users better and hopefully help you in making changes to your site to keep the user from dropping off. We recently did that on our site and deleted a field in our form which was discouraging people from submitting it. 

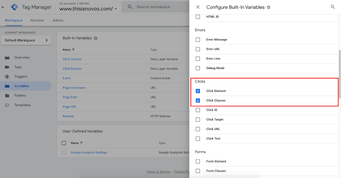
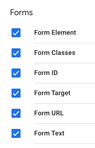
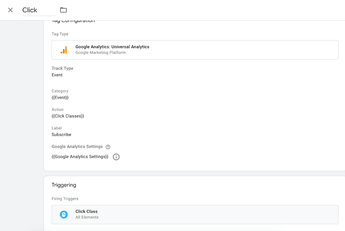
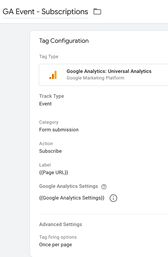
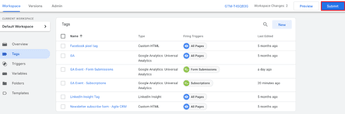
OK, event tracking is great but why do we use Google Tag Manager to set it up? Well, you can absolutely set up event tracking without using Google Tag Manager (GTM) but using GTM just makes it easier and quicker – allowing marketing tags to be updated and modified by the marketing team without requiring developer involvement.

If you want to set event tracking without GTM then you need to hardcode Google Analytics events by adding extra JS (JavaScript) code to the page. Imagine doing this across multiple pages and to track many different kinds of events – it will take so much time and will be quite inconvenient. Google Tag Manager is really the best way to do this.

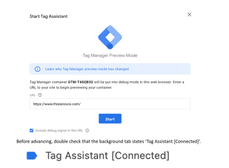
However, with an ever-changing interface, setting up event tracking through Google Tag Manager can be confusing, so keep this guide by your side and follow the easy steps!

Step 1: Finding what to track

The very first step when looking to track an event on your website is to determine what exactly the interaction is of that event. For example, phone number clicks require a click interaction on the phone number itself. 

Interactions that can be tracked in Google Tag Manager as events are;

  • Pages
  • Clicks
  • Forms
  • Videos
  • Scrolling
  • Visibility

Once we have determined an interaction which we want to track, we can navigate to that element on-page, and right click on it within Google Chrome.

For this example, we’ll be looking to track the contact us form submissions on our website.

Tap ‘Inspect’ on whichever interaction you would like to track.

inspect element

This will highlight the element which you are wanting to track within the developer console in Google Chrome. 

developer console in Google Chrome

For this example, as we’re wanting to track contact us submissions – we’d need to double-check that this element contains ‘submit’ in order to use the form submission built-in functionality in Google Tag Manager. 

Next, we’ll find something unique within this form. For this example, we can see that the form URL is /get-in-touch/thank-you within this form class – so we’ll use this.

If it didn’t have the submit functionality, we could set this event to fire on the button click itself combined with the form URL, but today we were lucky that this was set up correctly. 

If we wanted to track anything else on site, such as clicks on a certain button or on a certain page, then we would do so using an element found using the ‘Inspect’ function.

Step 2: Google Tag Manager Variables

It’s important to enable all variations which we are looking to track. To do so, head on over to Google Tag Manager. On the left-hand side, click on the ‘Variables’ tab. 

In this example we will enable each of the variables under ‘Forms’ – and to be safe, we’ll enable ‘Click Element’ & ‘Click Classes’, in case the built-in submission tracking in Google Tag Manager does not work as planned.

Click Element and Click Classes

form variables


The ‘Built-in Variables’ should be enough to track most elements on client sites, but customised variables may be required on occasion.

Step 3: Trigger & Tag Setup in Google Tag Manager

Now we have enabled all variables, we want to set up a trigger and tag in Google Tag Manager. Firstly, we’ll start with the trigger.

Head on over to the trigger tab on the left-hand side of Google Tag Manager – and tap on the ‘New Trigger’ button.

From here, we can set up a new trigger. It’s worth naming it something that will remind you of the event you are tracking – so this one we have set to “Form Submissions”.

As we’re looking to track a form submission which contains the ‘submit’ function – we can select GTM’s pre-built ‘Form Submission’ trigger type.

select GTM’s pre-built Form Submission trigger type

As our form links to a thank-you page, we can drill down to only fire the trigger on this form by targeting the following:

  • This trigger fires on -> Some Forms
  • ‘Form URL’
  • ‘contains’
  • ‘thank-you’

drill down to only fire the trigger on this form by targeting

Now that the trigger is set up, we can create a tag. Hop on over to the ‘Tags’ heading on the left-hand side of Google Tag Manager, before tapping on ‘New Tag’.

We’ll name this tag ‘GA Event – Form Submissions’ so we can add additional events later.

We’ll then set the following;

  • Category -> Form submission
  • Action -> Contact form
  • Label -> {{Page URL}} (this will dynamically pull the page URL the form was submitted on into Google Analytics)

create a tag

We can leave Non-Interaction Hit on false, as this would mean that if the event is fulfilled then the bounce rate will be set to 0 for that user’s session. This doesn’t matter to us at this stage. 

As Google Analytics settings are already linked up, this can be selected to feed information directly into Google Analytics from Google Tag Manager.

setting GTM

The only other option we would look to tick would be under the advanced settings – set ‘Tag firing options’ to ‘Once per page’.

This ensures that the tag is only firing once per form submission. This is really important as people may miss certain elements of the form, and we would only like one submission to be recorded per page – rather than one event recorded for each time they have interacted with the form. 

Once this is done, scroll all the way to the bottom of the tag, and link the trigger we created named ‘Form Submissions’ to the newly created tag named ‘GA Event – Form Submissions’.

form submission

Step 4: Debugging Google Tag Manager Tags & Triggers

Once you’ve linked up your tags and triggers, tap on the ‘preview’ button on the top right of the Google Tag Manager window

preview

The following menu will pop up in a new tab.

tag manager assistant

Type the URL of the site you wish to visit into this box, and tap on ‘Start’, which will open up another tab.

Once you’ve been taken to this new tab, you should be met with a popup in the bottom right corner stating that the debugger has connected.

debugger has connected

Double check that the background tab reads ‘Tag Assistant [Connected]’

tag assistant connected

If you have ghostery, ublock origin or any other adblockers installed, you may need to disable them if the debugger popup and tag assistant are not working as expected.

To confirm it is working as imagined, return to the original tab and confirm that tag assistant is connected. 

GTM connected meesage

Tap ‘continue’ when you’re done so there is no overlay on top of the triggers. Head back to the debugging tab, on the website you want to track events for.

Now that this is all configured as desired, we can navigate to the page or pages which you want to test are firing events correctly.

Complete whichever interaction you wish to track. For our example, we’re looking at form submissions, so we will fill the form out and tap on the submit button.

tracking interaction

Double-check the tag has fired correctly within the tag assistant tab. When completing a forms-based trigger, it is important to ensure that the tag is not firing for different forms – e.g the subscription form rather than the contact us form.

ga form

Now we are happy that the form submission GA Event is recording correctly, we can submit the container by tapping on the blue ‘Submit’ button on the top right of the Google Tag Manager menu.

submit the container

Within this window, we can then write a recognisable version name and description.

For this example, I’ve added in “Contact form tracking” – with a brief description of what I did within the GTM container. 

This is important so we can track changes to the GTM container should we have any issues with data tracking. 

Once this is done, double-check that this will be published to the live environment, before tapping on ‘Publish’.

Step 5: Checking events in Google Analytics

Now we head into Google Analytics. 

Under the ‘Realtime’ heading, we can tap on ‘Events’.

events


We then trigger the event one more time, to ensure that it is feeding into Google Analytics. Notably, gtm.click is recording as an event on this click as well – this event actually wants to record all ‘Subscribe’ clicks, so it is incorrectly recording when the ‘Contact form’ is interacted with. 

gtm is recording as an event on this click as well

Whilst we’re here, we may as well fix that event so we don’t have incorrect event data feeding into Google Analytics.

Knowing that these GTM tags are wanting to track subscription clicks only, we want to track a unique element of that form.  To find that, we’re going to navigate to any page with the form which we want to track, right click on the element, and tap on ‘Inspect’.

track a unique element of that form

We can see that the URL within this is https://novos.agilecrm.com/formsubmit – so we copy that to the clipboard.

Next, we want to find the offending tag in Google Tag Manager, and open it up.

find the offending tag in Google Tag Manager

We’d like the data to be coming into Google Analytics to be uniform – so we’ll update this to be the same format as the previous tag.


Because of this, we’ll set the following:

  • Name -> GA Event – Subscriptions
  • Category -> Form submission
  • Action -> Subscribe
  • Label -> {{Page URL}}

Under the advanced settings – we set the ‘Tag firing options’ to ‘Once per page’.

advanced settings

We’ll then scroll to the bottom of the tag to find the linked trigger and click on it. 

triggering

We’ll then update the following:

  • Name -> Subscriptions
  • Trigger Type -> Form Submissions
  • ‘Form URL’
  • ‘Contains’
  • ‘https://novos.agilecrm.com/formsubmit’ – which we pasted from our clipboard

Then tap ‘Save’ in the first window, this will minimise – and we can tap ‘Save’ in the second window.

Once we’ve saved this, we want to preview this container. Tap on ‘Preview’ at the top right side of GTM.

preview changes

Once the new window has loaded, fill out the URL and top on the ‘Start’ button.

setting up GTM

Then we can test the interaction we wish to track on the site.

Testing set up GTM

It’s worth double checking that other forms have not been triggered by this new event.

Now that we’re happy that the Subscription GA Event is recording correctly, we can save the container in Google Tag Manager. 

save the container in Google Tag Manager

This will bring us to a Submit Changes window.

Submit Changes window

From here, we can then write a recognisable version name and description once again about what was done in this GTM container. I’ve added in ‘Fixed subscription tracking’ with a brief description about what I did within the GTM container.

This is important as we have already run into data tracking issues within this guide!

Once this is done, double-check that this will be published to the live environment – then tap ‘Publish’.

Step 6: Confirming GA Events

Now we head back into Google Analytics. Under the ‘Realtime’ heading we can tap on ‘Events’. 

tracking events

We then trigger both events one more time, to ensure it is feeding into Google Analytics as desired.

gtm set up

We have success – now form submission events can be recorded and viewed in Google Analytics. 

To check events outside of realtime – we’ll head on over to the ‘Behaviour’ tab, then ‘Events’ – then ‘Overview’.

gtm set up test

Within this report, we can see our new event named ‘Form submission’ – so we will click on that.

Google Analytics report shows event tracking

Within this report we can select a primary dimension, because of how we have set this up, this can give us a lot of valuable information such as;

  • Category – That a form was submitted
  • Action – What type of form was submitted
  • Label – The URL that the form was submitted on

Step 7: Setting New and Updating Existing Goals in Google Analytics

Now events are successfully recording into our Google Analytics account, we can set the contact us form as a conversion.

On the bottom left hand side of Google Analytics – there is a cog named ‘admin’. Tap on this.

Setting New and Updating Existing Goals in Google Analytics

Once on this page, we’re met with the following;

  • Account
  • Property
  • View

Under ‘View’ – click on ‘Goals’.

GTM set up in GA

Once on this page, you can either create a new goal using the red button, or you can update an existing goal.

update an existing goal

To be safe, we’re going to set up a new goal in this instance.

Once you have tapped on the ‘New Goal’ button, the following window opens;

you can either create a new goal using the red button

For an events-based conversion, we want to set the ‘Goal setup’ to ‘Custom’ (located at the bottom).

Once this is done, click ‘Continue’.

Within the second step, we want to set a name that is instantly recognisable as the goal description. For this – we’ll set it to ‘Contact Us Form Submissions’.

Contact Us Form Submissions

We’ll then select the goal type, which will be an ‘Event’. 

Once this is done, click on the blue ‘Continue’ button to continue to the final step.

Finally, we’ll ensure that the Category and Action are exactly the same as defined within the GA event tag in Google Tag Manager, in the goal details.

We’ll set the following for this goal;

  • Category -> Form submission
  • Action -> Contact form

Category and Action are exactly the same as defined within the GA event tag in Google Tag Manager

As we’re pulling in the page URL dynamically within the label, we’ll leave this blank, and tap ‘Save’.

Whether setting this up for clients or internally, it is always worth asking for or creating an estimate for the monetary value of a contact us form – this can then be added to the ‘Value’ column to understand the value of contact us form submissions moving forward.

Step 8: Testing & Disabling Old Goals

Finally, we want to test the goal which we have set in Google Analytics by completing whichever event that may be.

Firstly, we’ll want to head back to the ‘Realtime’ report in Google Analytics, and select ‘Conversions’. 

conversions in GA

Then, we’ll test the goal on the live site. 

test the goal on the live site

Success! Our new goal is working perfectly.

Finally, we’ll look to disable our old goals. To do so, we’ll head back to the admin cog (at the bottom left of Google Analytics).

disable our old goals

Once we’re here – we navigate to the ‘Goals’ tab on the right hand side, underneath ‘View’.

Simply tap on the bright blue button that states ‘ON’ for recording – to turn it to ‘OFF’ for the old goal.

Navigate to the Goals tab on the right hand side

For this example, we want to disable the ‘contact is’ goal, which is now greyed out after being disabled. This indicates that it is no longer being recorded.

And that is everything! 

Now we are able to track events in Google Tag Manager and integrate this into Google Analytics.

If you have any questions for us about setting up event tracking in Google Tag Manager – feel free to drop us a message

Xavier Harley-Rudd from Novos
Article by Xavier Harley-Rudd
Xavier is NOVOS' senior SEO strategist and known for being a wizard thanks to his extensive knowledge of technical SEO. Passionate about organic search, Xavier has led several intricate projects in the past and continues to use his expertise to help eCommerce brands grow.

Get in touch with the eCom SEO specialists

We're eCommerce specialists for a reason, get in touch with us today and find out more.

I'd love to be sent your monthly newsletter for eCom tips, news and advice
Cyber warning: NOVOS (thisisnovos.com) is not affiliated with any other third party company and will never contact you other than from a legitimate thisisnovos.com email.